How to Create and Use JAR Files in Java
For convenient application distribution, Java provides a mechanism called JAR (Java Archive) files. JAR files are used for archiving and compressing data.
Basic command format for creating a JAR file is as follows:
jar -cf jar-file input-file(s)The generated JAR file will be placed in the current directory.
Let's examine the keys and arguments used in this command:
- The flag
cindicates that a JAR file should be created. - The flag
fspecifies that the output should be directed to a file rather than standard output. jar-fileis the name to be assigned to the resulting JAR file. You can use any name for the JAR file. By convention, the JAR file name is given a .jar extension, though this is not mandatory.- The argument
input-file(s)is a space-separated list of one or more files you want to include in your JAR file. Theinput-file(s)argument may also contain a wildcard *. If any of the input files are directories, their contents are recursively added to the JAR archive.
Rules regarding JAR file structure
- The
jarcommand automatically creates the META-INF directory. - The
jarcommand automatically generates the MANIFEST.MF file and places it in the META-INF directory. - The exact directory structure is preserved.
- The
javaandjavaccommands can use a JAR file just like a normal directory tree. - Searching for JAR files using the
-cpflag is similar to searching for package files. The only difference is that the path to the JAR file must include the JAR file name (e.g., classes/project1.jar).
Let's see an example of how JAR files are created and used.
Suppose our application has the following directory structure:
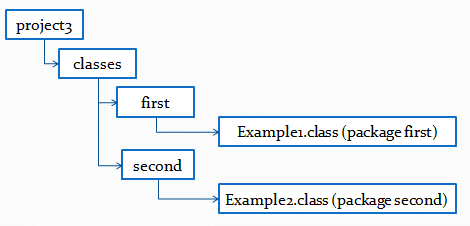
We will create a JAR file named project1.jar, which will contain the first and second packages:
cd project1/classes
jar -cf project1.jar first second
We can view the contents of the project1.jar file using the following command:
jar -tf project1.jarThe output will be approximately as follows:
META-INF/
META-INF/MANIFEST.MF
first/
first/Example1.class
second/
second/Example2.class
Now, we will move the created project1.jar file to the lib directory and run the first.Example1 program:
cd lib
java -cp project1.jar first.Example1
Run a JAR with one command: java -jar
If you specify a main class in the manifest, you can run a JAR without -cp and without the class name — just java -jar project1.jar. To do this, add the e (entry point) flag when creating the archive: jar -cfe project1.jar first.Example1 first second. The jar command writes Main-Class: first.Example1 into META-INF/MANIFEST.MF, so the JVM knows which class to launch.
Frequently Asked Questions
What is a JAR file in Java?
A JAR (Java Archive) is a ZIP-based archive that bundles compiled classes (.class), resources, and a manifest. It is used to distribute and run a Java application as a single file.
How do you create a JAR file from the command line?
Use jar -cf name.jar input-files. The c flag means create, and the f flag directs output to a file. For example, jar -cf project1.jar first second packages the first and second packages.
What is MANIFEST.MF and who creates it?
It is a metadata file located in the META-INF directory. When you create a JAR, the jar command generates the META-INF directory and the MANIFEST.MF file automatically — you do not create them manually.
How can you view the contents of a JAR without extracting it?
Use jar -tf name.jar. The t flag lists the table of contents of the archive — all files and directories inside the JAR — without extracting it.
How do you run a class from a JAR file?
Add the JAR to the classpath and name the class: java -cp project1.jar first.Example1. If a Main-Class is set in the manifest, java -jar project1.jar is enough — no -cp or class name needed.
Comments